A Good Gauge Swatch is...
- at least 5"x5", with a measurable centre area that is at least 4"x4"
- knitted (or crocheted) in the stitch pattern used for the pattern's gauge measurement.
- worked with borders that will help the swatch lay flat during measuring.
- washed and dried according to the ball band label OR as you plan to wash and dry the final product.
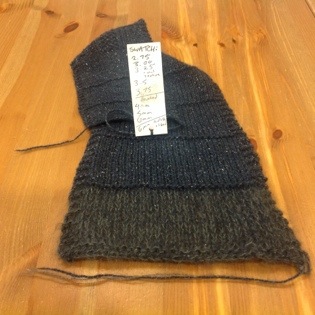
An Excellent Gauge Swatch also has...
- three (or more) separate sections where you work the stitch pattern with different needle sizes: smaller, suggested, and larger.
- a visual line separating each section so you can tell when needle sizes were changed.
- in-swatch coding to show the needle size used for each section, or thorough notes that will be kept with the swatch in a safe place.
- the yarn ball-band attached to the final swatch for future reference.
The gauge swatch in the photo above shows all of these things: multiple sections clearly defined by a purl ridge (some sections were worked with the yarn held doubled with itself or with another yarn) and all of the details have been written directly onto the back of the yarn's tag!
Knit a Stockinette Stitch Gauge Swatch
1. Find the gauge (it might be called tension) and needle size suggested in your pattern or on the yarn ball-band. If it gives you the gauge over 10cm / 4", write it down here: G= _____. If it gives you the gauge over 2.5 cm / 1", multiply it by 4 first.
2. Using the needle size recommended, cast on G plus 6 more stitches for your border.
Rows 1-7: Knit.
Row 8: Knit 3, purl to last 3 stitches, knit 3.
Row 9: Knit.
Alternate Row 8 and 9 until the plain section measures 5cm/2", ending after Row 9.
3. Take a preliminary measurement: if you lay a ruler across the flat middle section of the swatch (not including the textured borders), is it 10cm/4" wide?
Yes - Great! If you are also happy with the look and feel of the fabric, keep repeating Rows 8 and 9 until the flat middle section measures 10cm/4" tall, then work Rows 1-7 once more. Make a note of the stitch count and row count over a 10cm/4" square. Wash and dry your swatch as recommended on the yarn ball band OR as you plan to wash the finished garment, and recheck the measurement again.
No, it is less than 10cm/4" - Your needle is too small to match the gauge, so grab a larger needle, work one row in knit (even though the purl side is facing you - this creates a visible line on your swatch), then continue working your swatch as above, for another 5cm/2". Measure again!
No, it is more than 10cm/4" - Your needle is too big to match the gauge, so grab a smaller needle, work one row in knit (even though the purl side is facing you - this creates a visible line on your swatch), then continue working your swatch as above, for another 5cm/2". Measure again!
Special note for linen and other crisp yarns
If your yarn is one that may change dramatically when you wash it, we recommend making a long swatch with multiple sizes of needles:
Start with one or two sizes smaller than recommended, and continue bumping up every 5cm/2" until you are one or two sizes larger than recommended - remember to knit a visual line break at each needle change! Bind off, and wash the swatch as you plan to wash the garment. Choose the section of your swatch that has the gauge required by your pattern, or pick the section that has your preferred hand/drape, and use that gauge to guide your pattern selection!
Coding your swatch
To add a permanent reminder of the needle size you used for each section, there are at least three options:
- on a knit row, add a number of purl stitches in the middle of the row to indicate the needle size
- tie a short length of yarn through the edge of the section, and tie a series of knots in the yarn to indicate the needle size
- write clear notes on the back of the yarn ball band indicating the needles that you used throughout - this does require being able to read the stitches of your swatch once you have bound off, to know which way is up!
Stay tuned..
In a future blog post, I'll explain how knitting designers use gauge to describe the fabric required to duplicate their patterns, the common yarn classifications used in North America, and making appropriate substitutions for the yarn suggested by a pattern!