Designer: Christa Giles At Three Bags Full we love to feature knitted hats as shop samples: they are quick to knit, are ideal for showcasing a special yarn, and can be as easy or challenging as the knitter chooses! This pattern is a perfect First Hat for the beginner knitter: it starts with a mini scarf that turns into the button band, and ends with a graceful and easy spiral to close the top. There’s no button hole to worry about, as the large focal button is simply sewn on through both layers of fabric.
Materials:
100-160 meters / 110-175 yards worsted or aran weight yarn 5mm double pointed needles 5mm circular needle 40 cm /16†long 8 stitch markers Tapestry needle Large buttonGauge:
18 stitches = 10cm / 4". Adjust needle size if necessary to match gauge. Shop sample used 1 skein of Tanis Fiber Arts Aran hand dyed yarn and a button by Vancouver artist Joan TaylerPattern:
Using circular needle, cast on 88 stitches for a small adult’s hat. (See sizing chart below for modifying the pattern to fit other sizes) Button Band: Rows 1-14: Knit (just like a scarf!) Row 15: Bind off 7 stitches, then continue knitting to the last stitch of the row. Stretch remaining stitches around the circular needle until the first stitch meets this last stitch, and knit these two stitches together to join your hat band into a tube. The 7 stitches bound off at the start of the row will create a button flap that will be sewn in place later. You should now have 80 stitches on your needles, and will continue knitting your hat in the round. Hat Body: Knit all stitches until your hat measures 16 cm / 6†from the cast on edge. Crown shaping: Setup round: *knit 10, place a marker on your right needle; repeat from * 7 more times, place a final marker of a different colour (or identified with a scrap of yarn) to indicate the end of the round. Decrease round: *knit to 2 stitches before the marker, knit 2 together, slip the marker; repeat from * 7 more times. – 8 stitches have been decreased. Plain round: knit to end, slipping markers as you come to them. Repeat these two rounds until only 4 stitches remain in each section, then repeat the decrease round only until 1 stitch remains in each section. NOTE: when the hat becomes too small to fit onto the circular needle, transfer stitches onto double pointed needles, 2 sections per needle. Leaving a 20cm / 8†tail, break the yarn and use it to thread the tapestry needle. Take the needle and yarn through the centre of each remaining live stitch to remove stitches from knitting needles. Pull yarn tail tight to close the hole at the top of the hat, then take yarn to the inside of the hat and weave in the tail. Finishing: Overlap button flap to button band. Using the tail remaining from the cast-on, or with a new piece of yarn, attach button by sewing through all layers and the button’s shank (or holes) several times. Weave in all tails, and enjoy your new hat! A note on sizing: this hat can be easily sized up or down in increments of 8. See chart below for replacement stitch numbers, measurements, and decrease marker spacing.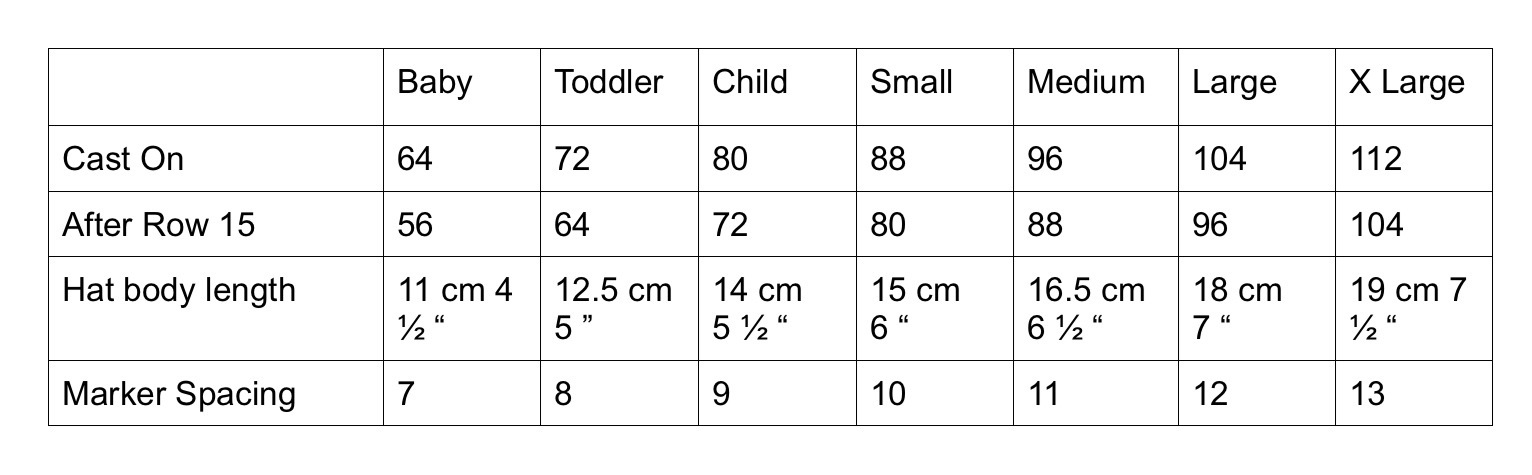
Copyright Christa Giles 2010. All Rights Reserved. Used with permission by Three Bags Full, unauthorized reproduction is prohibited. Are you ready to tackle this challenge? There are many resources for knitters online, and we recommend both Ravelry.com and KnittingHelp.com. If you prefer learning in person and need a helping hand, you can pop by the shop during regular store hours with a quick question, or look into a Private or Group Lesson if you need more assistance